Why do I like WebAssembly? And a Rust example!
2023-07-09
WebAssembly (abbreviated Wasm) is a binary instruction format for a stack-based virtual machine. Wasm is designed as a portable compilation target for programming languages, enabling deployment on the web for client and server applications. - https://webassembly.org/
WebAssembly and Rust are currently my favorite topics. As with many other engineers I work with, I don't usually spend much time doing web development. Therefore, when I talk about WebAssembly, many of them are not really sure why I am interested in it. The main reason is that the name is misleading. Although WebAssembly can be used to run fast applications on browsers, it can also be used to run applications on the server side. You can use WebAssembly almost like you would use Docker, and deploy your sandboxed application at the edge. I won’t talk about it in this text, but you can check out this article to learn more.
For me, the most interesting aspect of WebAssembly is the low overhead between host and guest applications when embedding a runtime. This opens up the possibility of extending software using plugin systems. However, before delving into the details of this, let's first review the basics.
The web
Let's take a moment to understand how WebAssembly works on the front-end. Normally, when you're on the web, you're executing untrusted code. You don't want a website making random I/O syscalls to your operating system. Therefore, by default, you want to block almost everything.
WebAssembly is built with this idea in mind. The wasm module runs in a sandbox and only has access to whatever the host application allows it to access.
In the browser, this means that you can import functions that are exposed from the JavaScript world.
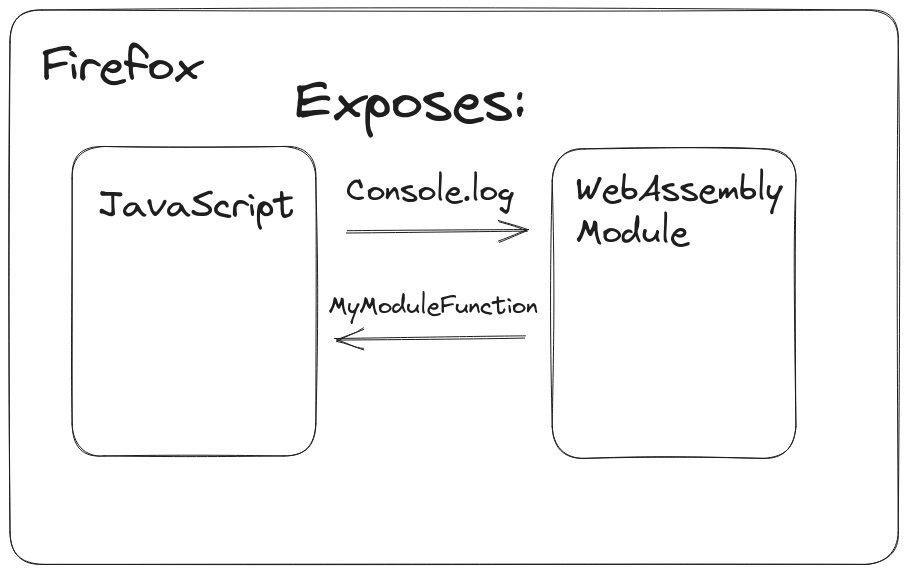
In the previous image, our WebAssembly Module has access to the console.log function. It exposes MyModuleFunction to be called in our JavaScript application.
However, it's not that simple. Some boilerplate code is necessary to correctly manage types and memory communication between WebAssembly and JavaScript. WebAssembly memory is simply an ArrayBuffer (or a SharedArrayBuffer). When passing arguments or receiving the return of a function, some work is required to properly represent those bytes as a JavaScript or WebAssembly type.
Writing the code by hand for WebAssembly can be tedious and error-prone. Fortunately, there are libraries available to generate the code for you. One such library is wasm-bindgen, although it is specific to Rust. However, generating the code is only a small part of the problem. Ideally, you want to easily describe what you expect to be available for the WebAssembly Module and what it must expose. For this purpose, you can use the WIT file from the component model. Then, use wit-bindgen to generate the glue code. The wit-bindgen is also more generic and should support more languages. Note that WIT, component model, and the wit-bindgen are not yet stable, so expect many changes in the coming months.
Embedding the Runtime
A WebAssembly implementation will typically be embedded into a host environment. An embedder implements the connection between such a host environment and the WebAssembly semantics as defined in the main body of this specification. An embedder is expected to interact with the semantics in well-defined ways. - Source
We can embed WebAssembly in our regular applications to run WebAssembly modules. From now on, I will refer to our regular applications as the "host" and the WebAssembly modules as the "guest."
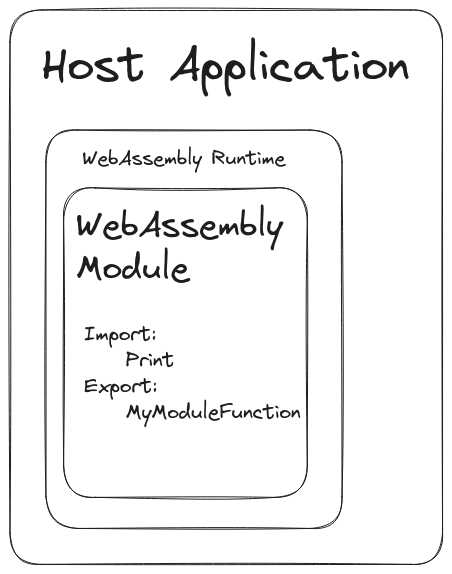
There are several runtimes available, each with a different focus or set of features. Some are designed for minimal footprint, while others aim to simplify integration with host applications. Personally, my go-to runtime is Wasmtime, which is well-maintained and has a large community.
Creating an application with WebAssembly Modules in Rust
Let’s use the WebAssembly runtime to allow users to extend an application with the Component Model. The source code is at github. I will be explaining the most important parts of it, but make sure to take a quick look at the source code before reading the rest of this post.
Before starting we need a couple of tools. First let’s add the wasm target for our rustc: rustup target add wasm32-wasi. Great, so now we can compile to wasm32. The wasi in the end has a special meaning. “WASI is a modular system interface for WebAssembly. As described in the initial announcement, it’s focused on security and portability.” (wasi.dev).
We also need wasm-tools, so let’s install it using cargo: cargo install wasm-tools.
Now let’s create our application: cargo new host-application and our plugin: cargo new --lib hello-world-plugin.
Let’s create our wit file as well. I have been using wit almost since July 2022. There were several changes during that period. There is a good chance that there will be small differences in the format in the future as well, so I suggest checking out the documentation if something does not work for you.
package plugin:demo

world plugin {
  import host: interface {
    log: func(param: string)
  }

  export run: func(param: string) -> string
}
So let’s start with our plugin because it’s the most simple code 😛. Our Cargo.toml looks like this:
[package]
name = "hello-world-plugin"
version = "0.1.0"
edition = "2021"

# In order to compile a wasi dynamic library
[lib]
crate-type = ["cdylib"]

[dependencies]
wit-bindgen = { git = "https://github.com/bytecodealliance/wit-bindgen", version = "0.8.0" }
Our lib.rs looks like this:
// src/lib.rs

// Use a procedural macro to generate bindings for the world we specified in
// our wit file
wit_bindgen::generate!("plugin");

// Define a custom type and implement the generated `Plugin` trait for it which
// represents implementing all the necessary exported interfaces for this
// component.
struct HelloWorld;

impl Plugin for HelloWorld {
    fn run(name: String) -> String {
        format!("Hello, {name}")
    }
}

// The following macro is generated by wit-bindgen and is always named `export_{world_name}`
export_plugin!(HelloWorld);
Remember that I told you that things are breaking and everything is not smooth yet for this, right? So a quick break to read a little bit of the documentation:
-
An important consideration when creating a component today is WASI. All current native toolchains for languages which have WASI support are using the
wasi_snapshot_preview1version of WASI. This definition of WASI was made with historical*.witxfiles and is not compatible with the component model. There is, however, a means by which to still create components from modules that are usingwasi_snapshot_preview1APIs. -
The
wasm-tools component newsubcommand takes an--adaptargument which acts as a way to polyfill non-component-model APIs, likewasi_snapshot_preview1, with component model APIs. The preview2-prototyping project is the current go-to location to acquire a polyfill fromwasi_snapshot_preview1to an in-development version of "wasi preview2" which is specified with WIT and the component model. -
Notably you'll want to download one of the adapter modules and name it
wasi_snapshot_preview1.wasmlocally to pass as an--adaptargument towasm-tools component new. Note that there are two modules provided on the downloads page, one is for non-commands which don't have a_startentrypoint in the generated core wasm module (e.g. thecdylibcrate type in Rust) and one that is for command modules which has a_startentrypoint (e.g. asrc/main.rsin Rust).(source)
Ok, so we will be downloading the reactor adapter from Wasmtime since it will be the runtime used.
wget https://github.com/bytecodealliance/wasmtime/releases/download/dev/wasi_snapshot_preview1.reactor.wasm
To compile we will run two commands:
cargo build --release --target wasm32-wasi
wasm-tools component new ./target/wasm32-wasi/debug/hello_world_plugin.wasm \
    -o hello-world.wasm --adapt wasi_snapshot_preview1=./wasi_snapshot_preview1.reactor.wasm
Now we should have a hello-world.wasm file. Let’s move it to host-application/plugins.
Our host is a bit more complicated. Our Cargo.toml looks like this:
[package]
name = "host-application"
version = "0.1.0"
edition = "2021"

[dependencies]
thiserror = "1.0.43"
wasmtime-wasi = { git= "https://github.com/bytecodealliance/wasmtime", branch="main", features=["preview2"]}
wasmtime = { git= "https://github.com/bytecodealliance/wasmtime", branch="main", features = ["component-model", "async"]}
tokio = { version = "1.29.1", features = ["full"] }
Tokio is there because I was not able to use the current component model without activating the async mode as well. thiserror makes life a bit easier to handle errors. Wasmtime is our runtime and wasmtime-wasi offers some helpers that are needed to make sure we expose the wasi default methods to our module.
So how do we get a WebAssembly Module and use it on our application? First of all, we need to expose the functions we promised to our module so we can properly instantiate it. From our wit the only function we are allowing them to use is the log function, so let’s do that:
// first let's generate all the glue code we need
wasmtime::component::bindgen!({world: "plugin"});

struct PluginRuntime{}
// Implements the Trait which represents the functions
// the module imported
impl crate::plugin::host::Host for PluginRuntime {
    fn log(&mut self, txt: String) -> wasmtime::Result<()> {
        println!("{txt}");
        Ok(())
    }
}
Ok, I was not been precise, we also promised to expose the wasi functions, so we need to somehow do it. We actually just need to expose WasiCtx. So let’s change our struct a little bit:
use wasmtime_wasi::preview2::WasiCtx;
use wasmtime_wasi::preview2::WasiCtxBuilder;

struct PluginRuntime {
    wasi_ctx: WasiCtx,
    table: wasi_preview2::Table,
}

impl PluginRuntime {
    pub fn new() -> Self {
        let mut table = wasmtime_wasi::preview2::Table::new();
        Self {
            wasi_ctx: WasiCtxBuilder::new().build(&mut table).unwrap(),
            table,
        }
    }
}
Let’s also create a WasmModule struct to represent any plugin we want to instantiate. The code is a bit complex, so read the comments to understand what is going on:
pub struct WasmModule {
    module: Component,
    linker: Linker<PluginRuntime>,
    engine: Engine,
}

impl WasmModule {
    pub fn new(path: &str) -> Result<Self, WasmError> {
        // An engine stores and configures global compilation settings like
        // optimization level, enabled wasm features, etc.
        let mut config = Config::new();
        config.wasm_component_model(true);
        config.async_support(true);
        let engine = Engine::new(&config)
            .map_err(|e| WasmError::GenericError(format!("{} {}", e, path)))?;

        // We start off by creating a `Module` which represents a compiled form
        // of our input wasm module. In this case it'll be JIT-compiled after
        // we parse the text format.
        //could use from_binary as well
        let module = Component::from_file(&engine, path)
            .map_err(|e| WasmError::GenericError(format!("{} {}", e, path)))?;

        let mut linker = Linker::new(&engine);

        // Links our Runtime exposing the methods to our module
        Plugin::add_to_linker(&mut linker, |state: &mut PluginRuntime| state)
            .map_err(|e| WasmError::GenericError(e.to_string()))?;

        // since we are using wasi, we need to add the functions related with it
        // wasi_preview2 is a helper that will do that for us
        wasi_preview2::wasi::command::add_to_linker(&mut linker)
            .map_err(|e| WasmError::GenericError(e.to_string()))?;

        Ok(Self {
            module,
            linker,
            engine,
        })
    }

    // invoke our plugin (the `run` function)
    pub async fn invoke(&mut self, arg: &str) -> Result<String, WasmError> {
        // A `Store` is what will own instances, functions, globals, etc. All wasm
        // items are stored within a `Store`, and it's what we'll always be using to
        // interact with the wasm world. Custom data can be stored in stores but for
        // now we just use `()`.
        let mut store = Store::new(&self.engine, PluginRuntime::new());

        // With a compiled `Module` we can then instantiate it, creating
        // an `Instance` which we can actually poke at functions on.
        let instance = self
            .linker
            .instantiate_async(&mut store, &self.module)
            .await
            .map_err(|e| WasmError::GenericError(e.to_string()))?;

        // our result will be here
        let mut result = [Val::S32(0)];
        // let's get the function we are interested and call it
        instance
            .get_func(&mut store, "run")
            .unwrap()
            .call_async(&mut store, &[Val::String(arg.into())], &mut result)
            .await
            .map_err(|e| WasmError::GenericError(e.to_string()))?;

        Ok(format!("{:?}", result))
    }
With all of that, we can call the module from our main function:
mod plugin;

#[tokio::main]
async fn main() {
    let result = plugin::WasmModule::new("plugins/hello-world.wasm")
        .unwrap()
        .invoke("world!")
        .await
        .unwrap();
    println!("{result}");
}
Now we can modify our main function to dynamically load any wasm file at the plugins folder and call the run function. Which I won’t do in this post.
The code for the WasmModule is a bit more complex than what I showed here, make sure to checkout the plugin.rs.